All blog posts to be considered for evaluation towards this submission can be located under the ‘Final Project M104MC‘ category.
Reflection.
My final project has turned out to be one of considerable scale with further areas to continue to explore after the end of the course. I have enjoyed it immensely and think it has been an overall success. There are a few areas that I didn’t get to finish that I would like to complete in the future, for instance the interview with Alison Lambert. I may look at using this project as platform to use to expand the idea further with funding from the City of Culture grant scheme that has recently been launched. I guess with this ambition I have found both the interest and the skill set to produce documentary films, I have never considered myself as a film maker before, but would be happy to include that in a description of myself.
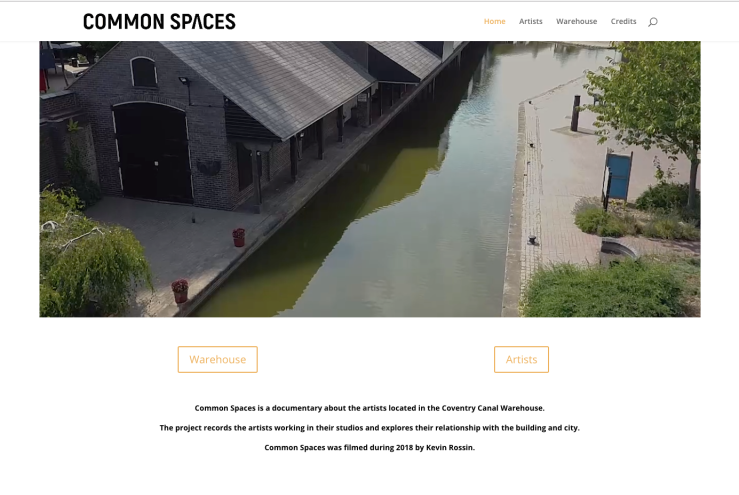
Common Spaces does show a sense of community, whilst acknowledging the individuality of each artist. It explores the studio space as well as the artist and their techniques.
I have succeeded in my goal of going out and producing a body of work whilst studying the MA, and this project is something I feel proud of and would be happy to show as a portfolio piece, even with it’s rough edges in places. I hope it leads to future projects working with other types of artists. I think the concept would translate well to a musician or band. I will have to improve on my journalistic skills if this was to be an on-going ambition.
I did enjoy experimenting with the 360 footage and the different ways or viewing the films, such as with the VR headsets. It would be great to look into embedding information within the 360 video footage. Although the render times for 360 video is pretty scary!
Working with such a great group of subjects has been very rewarding. My relationship with them all has grown outside of the project.
My thanks goes out to all who I have worked with and supported me during this process, with special to my wife Kate and son Remi for enduring my stress and giving me the time to work on my MA.
Thanks to the support and guidance from my tutor Ken Fero, he has taught me to always question what you are seeing.
Website design and building has come a long way in the last few years. To be honest, I have built a site for a long time, however my wife has done so for her different businesses. She was currently working on a new site for her new venture and was able to advise me on where to start.
It was at this point in my project where I had decided to name it, this was encouraged by the decision to build a website as I would have purchase a domain name to host the site. I had toyed with the name ‘Collective’ when I started working on the build in Klynt, but this didn’t fit the artists. It was in a conversation I had with Alan Dyer recently that ruled this name out when talking about how the Coventry 2021 City of Culture was being interpreted at the warehouse, the artists would only engage with the project as individuals and not as a collective from the warehouse. This made sense as they are all very different people/artists that happen to be under the same roof.
The emphasis shifted from the artists to the warehouse, as this was the entity that had drawn them together. I decided upon ‘Common Spaces‘ as the title of the project.
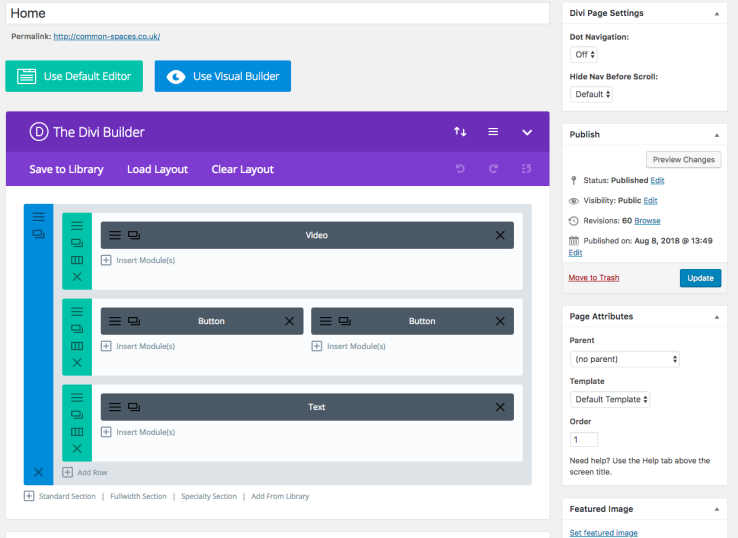
There are hundreds of companies that are producing theme, plugins and builders for WordPress these days. One of the leading packages is called ‘DIVI’ by a company called Elegant Themes. Kate had purchased the ‘DIVI’ builder package and was able to install a copy for me onto my nice and new WordPress page. ‘DIVI’ is a visual builder package, and works in a similar way as Klynt does by building the different elements of each page and linking them to the relevant media files. One limitation I found very earlier that I hadn’t realised was that there was a maximum file size limit of 100MB. This was a bit of a problem as most of my video files sat just over this amount. To get round this I had to upload my videos to YouTube.
My YouTube channel suddenly filled out
YouTube can take 4K video files, or 8K in 360 degree films, and at this point I toyed with the idea of re-exporting my films in a higher resolution. I decided to test the films as they were exported for Klynt on the website. They looked perfectly fine on the desktop and mobile phone, and most importantly there was no noticeable loading or lag time when they were selected to play. Test with the 360 videos were successful too, they sat in their own window on the website without the need to switch out to YouTube, you did have the option to turn the quality up in the window which caused some buffering, but this is the same if you were trying to view them on the YouTube site itself. You have both options to drag the video round or navigate via the arrows in the right hand corner.
Building ‘Common Spaces’.
Using ‘DIVI” was so easy. First you need to create a new page and name it. This then gives you the option to either start building the elements in the traditional builder or using the visual builder. Both work in the same way, you can add rows to the page and in turn you can add columns to reach row individual using simple template options. To any of these row and columns you can add modules. Modules can be anything from a simple button, a text box or a video player.
Creating a new pageAdding rows, columns and modulesWhat the page looks like in the visual builder
Each of the modules and rows in turn have a settings option that control all the elements, from sizing to design and playback options. Another element you can control is to switch between desktop, tablet and mobile formats. You have options to customise just for one of those platforms without effecting the other.
For each page you design, you can save them as a template to use again and again, making the build time quicker, all you have to do is change any links or media on the new page. I put together the site using the design templates I had made as seen below.
Content for the warehouse elements was supplied by the Canal Basin Trust who had approved the statements.
Home page designArtist page designArtist interview page design360/artist film page designWarehouse page designWarehouse page element designCredits page design
Refinement and redesign.
My main focus, with a deadline looming, was to make sure I had a fully functional site. I added the questions as overlays to each of my interview videos to help keep the design tidy. Another thing I was able to address was to stop the suggested videos on YouTube appearing when any of my files had reached the end, a quick look online suggested a WordPress plugin to add to my site that fixed the problem.
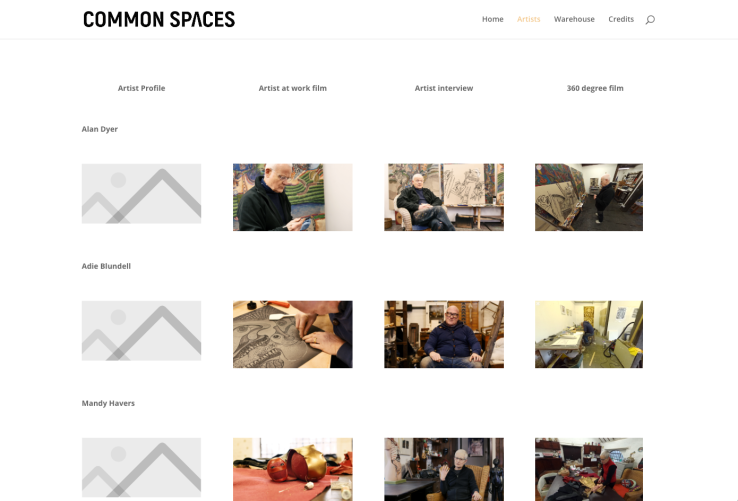
Another area I needed to review was the design element of the site. Although functional, the first version just lacked a slick design. By now I had the chance to arrange for the artists to all have their portraits taken by Kate which look amazing. To do them justice I used them as the pivotal element in redesigning the artist main page and individual page.
Top of pageBottom of page
As you can see above, the look of the page has improved dramatically. Using the images with labels released my from having to use grids with text headers and tidied up the design, both for the desktop and mobile devices. All that was left to do was to re-link the pages to their new versions and publish the page.
To go alongside the artist films, I wanted to include interviews with each artist to learn more about them, their praxis and their links to the warehouse. It also felt right to include this element as a part of the project, like the films needed the interviews as a balance to them. This would give the artists an opportunity to represent themselves rather than them just being seen through my interpretation via the short films.
Interviews seemed to be a good idea, however I was very conscious that the quality of them would hinge on the questions being asked. I had never interviewed an artist of any form in my life. I had to ask the right questions to add relevant information to the documentary. I did what most people do and had a look on the internet for interview questions, find several sites that specialised in dealing with artists. This was okay for an introduction into the area but I didn’t want to seem to asking the same old boring questions. Once again I took to the TV, watching as many documentaries that had direct interviews with artists on screen.
I prepared a list of questions for my first subject – John Yeadon.
Can you describe yourself as an artist, your praxis and what your most recent body of work explores?
How has your praxis developed over the years and have they been influenced by other artists, where you have lived or development in technologies or trends?
What is your connection to the Canal Basin Trust?
How long and what involvement have you had with the Canal Warehouse?
What do you think the challenges are for artists working in Coventry and what have you faced working here?
What do you think is the biggest challenge that the Canal Basin Trust has had or has to face?
Can you talk about your influences/collections?
Open subject – artists given free reign at a topic they want to talk about.
I thought that the questions gave me enough of a range of topics that the artists would be able to get into and talk about. I initially prepare this list of questions just for John Yeadon, however it soon occurred to me that for the structure of the project, it was best to ask the same framework of questions to all the artists but allow the flexibility to ask further follow up questions if required to explore the subject/artist more.
Lighting.
From a technical point of view it was important for the interviews to look good. We would be in the artists’ own studio, so it would hopefully have good light, however I planned ahead in case there were any issues as I couldn’t rely on just using ambient lighting to make the interview look good. I found an very informative article on interview lighting techniques on the borrowlenses.com blog, however their setups required a lot of equipment that I didn’t want to drag in an put off the interviewees.
I took the most important lesson about location to heart. For each artist I positioned them so there was an interesting background and a reasonable distance between that and the subject to allow for depth to the image. I brought a 30cm x 30xm diffused LED panel for my key light and had a couple of small LED panels in my bag to use as hair lights if needed. I think I only needed to use the small panels once as there were a lot of light sources already available in each studio. I used windows as a fill lights where possible to balance scenes out.
Sound.
For the interviews I decided to use a separate Zoom H5 audio recorder to use with a wired clip mic and the on board stereo mic capsules. I initially though about using a rifle mic above each subject but once again ruled this out as it might put off the subjects. I also used the same Sure VP83 on-board microphone on the camera to give me a backup if anything went wrong with the H5 unit, if the sound went wrong for the interviews then it would be pretty much pointless! The cameras levels were set and left and I monitored the sound from the Zoom H5 to make sure it was both working and of good quality. During the interviews I did find that there were a couple of issues, the first with stray hands from expressive artists that caught the clip mic making it peak, the second was with John Yeadon who asked to get up and show me something in the room partway through an answer. I had to cut this question completely in the edit as he disappears out of shot and the wired mic cable limits where he wanted to go to. Apart from that, the setup was very successful.
Filming.
John Yeadon in mid-spiel.
This was a pretty much straight forward process. The GH5 camera was on the same settings as for the short films, it was on a tripod so that there was stability in the framing over the longer shots. I framed the subject differently in each interview to give variation to each one and in response to the contents of each studio. I didn’t ask the artists to tidy up as this was their space and creative surroundings. The interviews lasted around 25-30 minutes depending on the length of answers and if there were any extra questions I included.
Editing.
Now for the fun part!
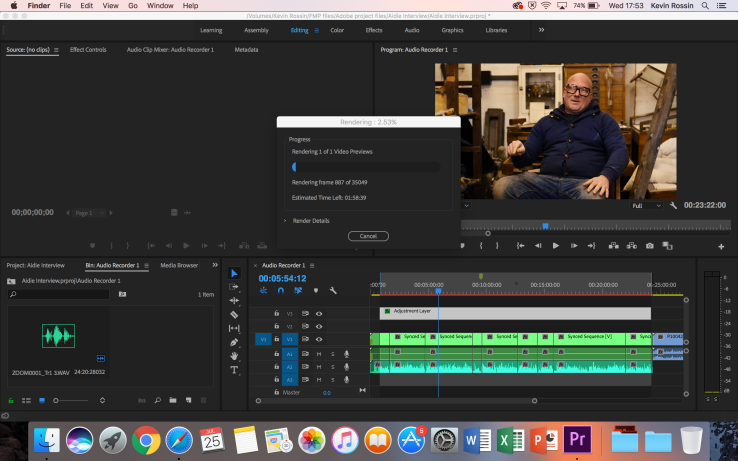
Editing the interviews took a long time. The first thing I had to do was to sync up the audio from the Zoom H5 recorder with the video files from the GH5 camera. To do this I asked a friend for access to a software program called Pluraleyes by a company called Red Giant. This takes your video files and uses audio files from the on board camera mic and syncs them with the audio files from the Zoom H5 audio recorder by analysing the wave forms. It gives you a very nice little Adobe Premier project file that you drop onto the timeline in Premier and it opens up all the files nicely synced together. In Premier you can then select what audio track you want to use, in my case I only used the clip mic and then proceeded to edit the interviews as normal.
Each question was cut into separate clips, removing my voice asking the question as it was very feint and I didn’t want to be part of the finished clip. The same adjustment layer was copied and pasted from the films onto the interviews to enhance the colours and keep the same palette.
Although the audio from the clip mic was of a decent level and clarity, when you compared it to the audio from the on camera mic it was lacking in the ambience of the space. To fix this issue I decided to add a small amount of reverb to the track using the packaged audio effects included in Adobe Premier. I found by adding the preset of ‘Room ambience’ to the track, it lifted it and gave it a comfortable spacial presence when played against the image.
Adding reverb to the audio track
The next stage was to render the files together in preparation for export. As you can see below, because of the file lengths being used, this part of the edit process took a very long time to complete. When ever I had to do this it was always time to make a cup of tea or a quick lunch break!
Once the mammoth render had completed, the next stage was to export each question as a separate video file. To do this I set the ‘in’ and ‘out’ points to the start and end of each question on the sequence panel. I then followed the same process as per exporting the individual films, with one exception, I selected to queue the export which opened up Adobe Media Encoder.
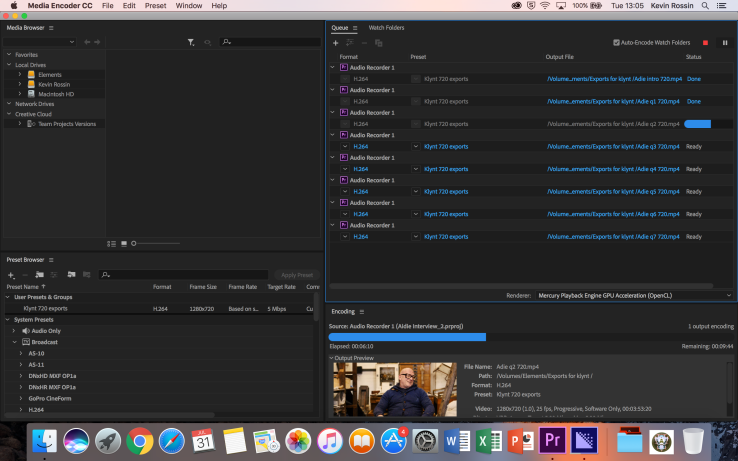
Media Encoder is a dedicated piece of software that allows you to queue up a list of files and set it running to batch process them when you are ready. I repeated the steps above setting out the ‘in’ and ‘out’ points and added them to the list of files in Media Encoder. Once the files were all ready to go Media Encoder sat in the back ground working away until the files were all exported.
Media Encoder working on a list of interview files.
This process was repeated for each interview and the files save and cataloged ready for importing into Klynt.
Unfortunately I was unable to arrange and interview with Alison Lambert due to her work commitments at the time. This is something I hope to complete in the future so I have a full set of films and interviews for all the project participants.
I’ve got to a point where I have started to compile my documentary together. I have started to use Klynt to build the project, however I have found limitations with the design aspects that are incredibly frustrating, text and buttons move from where they sound be located when previewed in a browser. To add to this, Klynt websites do not work on mobile devices because it uses Flash, an outdated piece of software that is about to be discontinued by Adobe in a few months. I am at a quandary, a crossroads you would say. From a test this evening, I can produce most of the features and design aspects in a WordPress site and future-proof my project, including allowing it to be mobile friendly.
I think I will take the WordPress route and see how I fair…